Before you can start generating your voice, you first need a script! For most of us, we have an idea of what content we want to produce but no idea where to start. This is where our AI Script scriptwriting tool can help you out.
In this tutorial, we’ll run through the basics of how to use AI Script and beat the dreaded writer’s block.
AI Script is available and free to use for all Pro, Pro+, and Enterprise members. For more information about our different subscription tiers, please view our pricing page.
Step 1- Getting Started
Once you have created your project, click on the AI Generator icon located on the left-hand side.
Then, click on the “AI Script” icon on the left.
You will then be presented with eight different templates to choose from. Select the template that is the best fit for the content you would like to create, and then click “Next” at the bottom of the window.

Step 2 – Generating
For the purpose of this tutorial, we have selected the “Explainer” template. Each template will have a couple different prompt variations which will create a script that is most suited to this type of content.
When completing the field, we suggest that you enter as much information as you can. The more you can provide, the better your script will be. This can be an outline of points you want to cover, the contents of a blog, or an idea that you have that you want to make into a script.
Once you are ready and have completed all the prompt fields, click “Create” and AI Script will get to work!

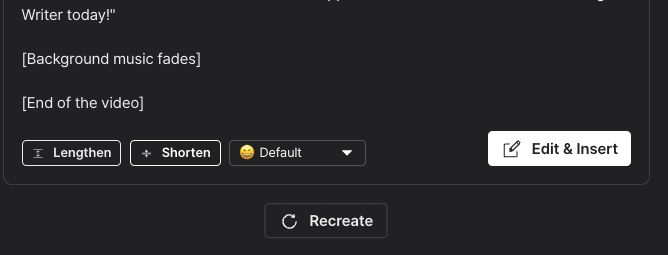
Once your script has generated, it will appear on the right-hand side of the window. At the bottom of your script, you will have a few options – all of which cost zero generation credits!
- Lengthen – adjust the length of your script to be longer.
- Shorten – condense your script to be shorter.
- Tone – change to a different tone.
- Edit & Insert – keep the script and make edits before adding it to your project.
- Recreate – keep everything the same but regenerate a new script.
Please note: Once you click “Edit & Insert,” you can not go back to the previous screen, so make sure you are ready to move on to the next stage before clicking the button.
Step 3 – Editing
Once you are happy with the overall script and have clicked “Edit & Insert,” you will have the opportunity to make any edits before it is inserted into voice blocks. You can, of course, make edits once it is in the voice blocks, but it can be easier to make changes when it is presented in one full screen.
Once ready, click “+ Add to Project,” and it will be inserted into voice blocks, with each paragraph becoming a single voice block.
Tip: Before inserting, remove any text that you do not want to be read aloud. Everything in the script will be inserted into a voice block. We suggest copying and pasting the full script into a Word doc or Google doc so you have it for reference and deleting anything you don’t want to be part of the script, which is typically inside square brackets [ ].

Step 4 – Adjustments
After the script is added to your project, you will be able to make further adjustments such as:
- Adjusting voice blocks
- Selecting your speaker
- Making any changes to spelling – e.g., acronyms will be read out as individual words, so now is a good time to adjust if needed, e.g., SWAT should be changed to swat, or else it will be read out as S W A T.
Generating your voice blocks for the first time will use credits, so it is good to do some checks before generating. However, regenerating is free so long as there are no changes to the text or speaker.

And that’s all there is to it for using AI Script!
As the tool is free to use, you can create as many different scripts as you like and experiment with different prompts, tones, and lengths to see what works best for you and your brand!